鉱山
| 鉱山 | |
 | |
 | |
| 定休日: | 無休 |
| 居住者: | |
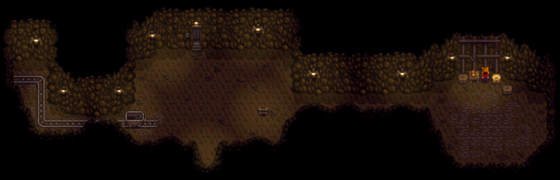
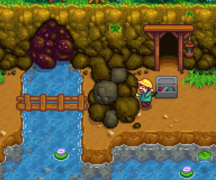
鉱山は山の北部(大工作業場の北東、冒険者ギルドの西辺り)にある。入り口は春の5日に開通を知らせる手紙が届くまでは岩屑で塞がれている。
鉱山内は全120階で構成されており、深く潜るほど鉱石の質(種類)、量が上昇する。鉱山内は岩石と部分的に掘り返せる土で占められている。岩石はツルハシで採掘することで石、鉱石、ジオードが掘り出せる。掘り返せる土の部分はクワで耕すことで鉱物、発掘品、鉱石、粘土、洞窟ニンジンを入手できる。
鉱山の下層に到達するには、各階ではしごを見つける必要がある。はしごは岩を破壊、またはモンスターを倒すと時々出現する。(モンスターを倒す方法であればはしごを探すための体力の節約になる。)階層が"モンスターフロア"であった場合は、はしごを出現させるために全てのモンスターを倒す必要がある。
採鉱スキルが2になると、階段(石99個からクラフト)を使うことでフロアをスキップすることができるようになる。5階降りる毎にエレベーターが出現し、いつでもその階層へ移動することができるようになる。
鉱山で倒れると直近の踏破したフロアを忘れてしまう。一般的におよそ5~11階層の記憶が失われ、その間のエレベーターも再びその階層へ到達するまで使用することができなくなる。プレイヤーの所持金の10%や、武器や道具、特別なアイテム(ギャラクシーソードや指輪を除く)等を含むアイテム類も失ってしまう。道具を失うと後日手紙に同封されて戻ってくるが、釣り竿と武器は戻ってこない。
トロッコは鉱山の入り口にあり、鉱山への往復を早めてくれる。公民館のボイラールームのバンドルを達成するか、Joja地域開発フォームから購入することでアンロックされる。
階層
鉱山は120の階層で構成されている。これらの階層は40階ごとの3つのことなるテーマを持つセクションに分かれている。最初のセクションは茶色い地面のテーマ、2つめは氷のテーマ、3つめの最後のセクションは溶岩と紫の地面のテーマである。それぞれのセクションの最後の10階層には更に異なるテーマがある。最初のセクション(31-39階層)は暗闇、2つめ(70-79)は城、3つめ(110-119は)暗い真紅のテーマとなっている。
それぞれのセクションの相応する階層は同じレイアウトになっている。例えば、1,41,81階層は同じレイアウトである。2,42,82あるいは10,50,90も同様である。
| 階層 | テーマ | モンスター | 宝 | 備考 |
|---|---|---|---|---|
入り口
|
茶色い地面 | なし | トロッコがある。 東の塞がれた小道の向こう側にドワーフが住んでいる。 (障害物を破壊するには鉄ツルハシまたはチェリーボムが必要。) | |
| 1 - 9 | 茶色い地面 | 見つかる宝石: アメシスト, トパーズ, 水晶, アースクリスタル | ||
| 10 | 茶色い地面 | なし | ||
| 11 - 19 | 茶色い地面, 雑草 | 19階層は螺旋状になっている。 | ||
| 20 | 茶色い地面, 雑草 | なし | 釣り: ヒヨケウオ, ダルマオコゼ | |
| 21 - 29 | 茶色い地面, 雑草 | |||
| 30 | 茶色い地面 | なし | 報酬なし | |
| 31 - 39 | 暗闇, 灰色の地面 | 銅鉱石, ジオードがよく採れる。 | ||
| 40 | 氷の地面 | なし | ||
| 41 - 49 | 氷の地面 | 鉄鉱石, フローズンジオード, アクアマリン, イエティのなみだ, ヒスイがよく採れる。 | ||
| 50 | 氷の地面 | なし | ダイヤモンドが出現しだす (石500から1つ程度)。 以降の50階層で0.00016ずつ出現頻度が上昇していく(例: 100階では石100から1つ)。 | |
| 51 - 59 | 氷の地面 | ススおばけ(石炭ドロップ)が多い。 52階層には小道の終点に石炭袋が落ちている。 | ||
| 60 | 氷の地面 | なし | 釣り: アイスピップ, ヒヨケウオ | |
| 61 - 69 | 氷の地面 | |||
| 70 | 氷の城 | なし | ||
| 71 - 79 | 氷の城 | フローズンジオード, 鉄鉱石がよく採れる。 | ||
| 80 | 溶岩, 紫の地面 | なし | ||
| 81 - 89 | 溶岩, 紫の地面 | 金鉱石と マグマジオードが出現しだす。 エメラルド, ファイアクオーツ, ルビーがよく採れる。 | ||
| 90 | 溶岩, 紫の地面 | なし | ||
| 91 - 99 | 溶岩, 紫の地面 | 石炭がわずかに採れる。(ススおばけがドロップ)。 | ||
| 100 | 溶岩, 紫の地面, 雑草 | なし | 釣り: 溶岩ウナギ | |
| 101 - 109 | 溶岩, 紫の地面, 雑草 | 金鉱石がよく採れる。 | ||
| 110 | 溶岩, 真紅の地面 | なし | ||
| 111 - 119 | 溶岩, 真紅の地面 | |||
| 120 | 溶岩, 紫の地面 雑草 | なし | 最深階 |

|
不完全な翻訳 この記事またはセクションはまだ完全に日本語に翻訳されていません。あなたがこのテキストを編集して、記事の作成をサポートしてくれることを歓迎します。 |
Ladders
Ladders can be dropped from Monsters[1], Rocks[2], or spawned on load[3]
Every monster killed has a flat 15% chance of spawning a ladder, assuming the enemy was killed over an unobstructed tile. This does not prevent ladders spawning from rocks.
Some levels are preloaded with a ladder (12, 52, 92, treasure floors in skull caverns). These ladders do not prevent ladders spawning from rocks.
After a level loads, there is a 95% chance that a ladder will try to spawn. A tile is chosen at random, and if it is unobstructed then a ladder is placed. This will prevent ladders spawning from rocks
Every rock hit has a base chance of 2% of spawning a ladder. This is adjusted by daily luck/5 (+/-10% / 5 = +/- 2%) and food buffs (every point of buff/100 i.e. each point of food buff adds 1%). The inverse of the number of rocks remaining after the rock is hit is added (e.g 5 rocks remaining - 1/5 = 0.2 = 20%, 100 rocks remaining = 1/100 = 0.01 = 1%). If no enemies remain then 4% is added. If this chance hits, then a ladder will spawn, and prevent further ladders spawning from rocks. If you are in the skull caverns there is a 20% chance that a shaft will spawn instead, and this does not prevent further ladders/shafts spawning from rocks
Crates and Barrels
Crates and barrels in the mines drop items when destroyed at the following rates[4]:
| Item | 0-39 | 40-79 | 80+ (including Skull Cavern) |
|---|---|---|---|
| Nothing | 25.2% | 25.2% | 25.2% |
| 10.4% | 10.4% | 5.2% | |
| 10.4% | 5.2% | 5.2% | |
| 5.6% | 5.6% | 5.6% | |
| 5.2% | 5.2% | 5.2% | |
| 5.2% | 5.2% | 5.2% | |
| 5.2% | 5.2% | 5.2% | |
| 0% | 5.2% | 5.2% | |
| 0% | 0% | 5.2% | |
| 7.8% | 7.8% | 7.8% | |
| 8.2% | 0% | 0% | |
| 0% | 8.2% | 0% | |
| 0% | 0% | 2.6% | |
| 0% | 0% | 5.6% | |
| 5.6% | 0% | 0% | |
| 5.6% | 0% | 0% | |
| 0% | 5.6% | 0% | |
| 0% | 5.6% | 0% | |
| 0% | 0% | 5.6% | |
| 0% | 0% | 5.6% | |
| Special Item | 5.6% | 5.6% | 5.6% |
特別なアイテム
以下は、木箱と樽、または特別なアイテムを持っているモンスターから入手できる特別なアイテムです。[5]
|
|
Dirt Patches
The following table lists the chances of finding items available from dirt patches [6]. It doesn't matter if a hoe or a bomb is used to dig the soil.
| Item | Chance |
|---|---|
| Nothing | 85.9% |
| Dwarf Scroll I | 0.16% |
| Lost Book/Mixed Seeds | 0.16% |
| Rusty Spoon | 0.16% |
| Rusty Spur | 0.16% |
| Skeletal Tail | 0.16% |
| Dwarvish Helm (Floors 1-40 only) | 0.1% |
| Dwarf Scroll II (Floors 1-40 only) | 0.1% |
| Dwarf Gadget (Floors 41-80 only) | 0.1% |
| Gold Bar (Floors 41-80 only) | 0.1% |
| Dwarf Scroll IV (Floors 81-120 only) | 0.2% |
| Strange Doll (yellow) | 0.03% |
| Strange Doll (green) | 0.03% |
| Stone | 1.33% |
| Ore (Level appropriate) | 1.33% |
| Clay | 4.68% |
| Omni Geode | 0.17% |
| Geode (Level appropriate) | 0.51% |
| Cave Carrot | 5.03% |
食料
鉱山に潜るときに有用な食べ物。
| 画像 | 名前 | 説明文 | 能力値ボーナス | 効果時間 |
|---|---|---|---|---|
| 秋のめぐみ | 秋の味覚がそろった一皿。 | |||
| コーヒー | かぐわしい香りの飲みもの。飲めばからだがシャキッとする。 | |||
| クラブケーキ | カニの身、パン粉、タマゴをあわせたパテをキツネ色になるまで揚げた一品。 | |||
| クランベリーソース | 祝日のお祝いにはかかせない。 | |||
| ナスのチーズ焼き | ピリ辛、チーズたっぷりなおいしさ。 | |||
| ウナギフライ | 油っぽいが味はたしか。 | |||
| キノコいため | キノコのうまみと香りがぎゅっとつまった一皿。 | |||
| ラッキーランチ | とっておきの軽食。 | |||
| メープルバー | 上にメープルシロップがかかったあま~いドーナツ。 | |||
| マインキャンディ | 採掘のときのエネルギー補給に。 | |||
| 揚げトウガラシ | トウガラシにチーズをつめ、パン粉をまぶして揚げたもの。 | |||
| カボチャのスープ | 秋のごちそう。 | |||
| 根菜盛り | 食べると力がわいてくる。 | |||
| ピリ辛ウナギ | とっても辛い!食べるときは気をつけよう。 | |||
| 肉づめ | パン粉とセージの香りがただよう一品。 | |||
| パワフルいため | エネルギー補給にピッタリの一品。 |
|
Swarms
If the screen becomes "misty", "glowy", or "foggy", several of the current level's flying monsters will spawn and attack. Consuming Oil of Garlic will prevent these infestation fogs.
モンスターフロア
時折、スライムあるいは複数のモンスターの群れがはびこるフロアに侵入することがある。通常のフロアと異なり岩がなく、スライム襲撃層は通常のテーマの壁や床が緑のスライムで覆われている。水晶やキノコといった採集アイテムは見つけることができる。モンスターフロアから脱出するには、全てのモンスターを倒すまで戦う必要があり(土中にいるダギーも含む)、最後のモンスターを倒すとその場もしくは入り口の近くにはしごが出現する(「はしごが出現した」というメッセージが表示されるのですぐ気付ける)。
アイテムの階段を使用することでもモンスターフロアから脱出できる。
モンスターフロアは常に1日の間同じ階層に出現し、翌日はひとつ上の階層になる。もしある日モンスターフロアが54階に出現したとすれば、翌日には53階、その翌日は52階…となる。日によっては、モンスターフロアが出現しないことがある。これらは出現するはずの階層がエレベーター/宝箱フロア、最初の5階、最後の10階、各セクションの19階目(フロアのセクションについては前記参照。)になっている。一度に複数のモンスターフロアが出現することがあり、それらはおよそ20階以上は離れて発生する。
The Oil of Garlic Buff prevent levels from being infested. Oil of Garlic must be consumed before entering the level to prevent infestation.
Repeatedly visiting infested floors can be an excellent way to quickly achieve some of the Monster Eradication Goals at the Adventurer's Guild.
The Mushroom Floor

Sometimes a floor in the lower section of the mine (levels 81-119) will have greatly increased spawns of red and purple mushrooms. These floors will also notably have a variety of colored lanterns which usually includes at least one green lantern. Mushrooms will continue to respawn on that floor throughout the same game day (even if the player quits and restarts,) and so repeated trips can be made to collect a large number of mushrooms.
Because of the way the game chooses such floors, the mushroom floor will "move up" one level each day; for example, if level 94 is a mushroom floor on Spring 5, then level 93 will be a mushroom floor on Spring 6. A player could thus track the mushroom floor and only choose to exploit it when the level can be reached quickly such as when it is one floor below an elevator. Note however, that no mushrooms will spawn on an elevator level itself (floors ending in 0 or 5) or if the level is infested (see previous section.) Additionally, the mushroom floor is neither unique nor guaranteed -- there may be multiple active mushroom floors or no such floors at all on a given day, and that situation may persist for several days or weeks.
Floor Reset
As of v1.3, mine floors sometimes reset in an unpredictable way, especially if playing in multiplayer. In singleplayer, there is a good chance that a mine floor will reset at the next 10-minute tick of the in-game clock, measured from the time the player leaves the floor. In multiplayer, a mine floor may not reset until all players leave the floor, and the clock advances 10 minutes.
The Bottom of the Mines
鉱山の120階には骨の鍵がある。骨の鍵は砂漠にあるドクロの洞窟へと続く扉のカギを開ける。また、スタードロップサルーンにあるマシンジュニモカートのプレイをアンロックするのにも使用する。
Furthermore, reaching this floor also changes other parts of the game:
- prismatic shards and diamonds will now rarely drop from any monster
- gems and purple mushrooms may now be found when searching trash bins
- gems and purple mushrooms may now be requested in NPC quests
- some monsters will be stronger
(These changes were introduced in patch 1.3.27.)
トリビア
- 剣の代わりにオノ、カマ、つるはしでモンスターを倒すこともできる。
- 石は大工作業場で1つあたり
 20gで購入することができるので、所持金が250,000g程度あれば石で階段をクラフトし、120階全てをスキップすることが可能である。(後でいつでも戻れるようにいったん全ての階層を解放するのに有用?)
- If all monsters on a level are killed, the chance of finding a ladder under a broken rock is increased by 4%.[8]
裏技
- Repeatedly clicking the journal icon until the journal is open during a death animation will cause the cutscene where a villager finds and revives you to be skipped. It also prevents the loss of items and gold, and the "forgetting" of mine levels.
ギャラリー
鉱山の入り口
The blocked Mine Entrance before Spring Day 5
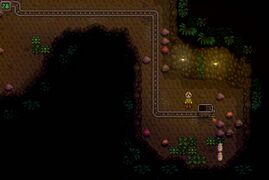
いっぱいの石炭が隠されたトロッコ


更新履歴
参照
- ↑ See MineShaft::monsterDrop in the game code.
- ↑ See MineShaft::checkStoneForItems in the game code.
- ↑ See MineShaft::populateLevel in the game code.
- ↑ See BreakableContainer::releaseContents in the game code.
- ↑ See MineShaft::getSpecialItemForThisMineLevel in the game code.
- ↑ See MineShaft::checkForBuriedItem in the game code.
- ↑ See Monster::parseMonsterInfo in the game code.
- ↑ See MineShaft::checkStoneForItems in the game code.
| 場所 | |
|---|---|
| 場所 |
石切場 • 石切場の坑道 • 裏の森 • 火山ダンジョン • カリコ砂漠 • 下水道 • 鉱山 • ジンジャーアイランド • シンダーサップの森 • 線路 • ドクロの洞窟 • トロッコ • トンネル • 農場の池 • 農場の洞窟 • 墓場 • バス停 • 秘密の森 • ペリカンタウン • ペリカンビーチ • 牧場 • 魔女の沼 • ミュータントバグのすみか • 山 |